¶ Hello, this page is maintained by Alex Schulster & Maxime Chantemargue
¶ If you have a problem with your board setup or have question about something written in this tutorial, please contact us via Slack or at alex.chulster@etu.utc.fr, maxime.chantemargue@heig-vd.ch
¶ If you spot an error, or think you can improve this tutorial by any mean, please feel free to edit this page.
¶ Introduction
Project Wildhorn's avionics system will use an STM32 chip. It is therefore important to us being able to test our code on this precise chip. This is why we are using Development Boards (Our exact model is the STM32MP157D-DK1).
This wiki provides step by step tutorials for the following:
- Install and activate the STM provided SDK (Software Development Kit)
- Upload an OS image to the Development Board through STM software STM32CubeProgammer
- Compile your own version of the OS from the (modified) source code, and then upload it
¶ Prerequisites
To follow this tutorial, you will need:
- A STM32 Development Board
- USB-C cable to connect your PC to the board via the OTG port
- A Micro-USB cable to connect to the board with Minicom
- A 5V - 3A power supply for the board
- A computer running Linux (if you are on Windows or MacOS, you should use a Virtual Machine, with Virtual Box for example). The version used in this tutorial is Ubuntu 20.04.3 LTS
¶ Mounting OS on SD card using script
We will populate the SD card using a script from STM instead of STMProgrammer that can occur some problems. In common cases you do not have to mount your image on the card because ST provide a already populated SD card. In the case of you want to re-deploy an image from scratch, please follow theses steps.
¶ What we need ?
- A empty 16 GB SD card. (make sure there is no partition)
- creation script from this package
¶ Steps
- create a folder to unzip the downloaded package:
mkdir $HOME/stm32_populate_sd_card,cd $HOME/stm32_populate_sd_card - unzip the package:
tar xvf en.FLASH-stm32mp1-openstlinux-5-10-dunfell-mp1-21-11-17_tar_v3.1.0.xz cd stm32mp1-openstlinux-5.10-dunfell-mp1-21-11-17/images/stm32mp1/scripts/- create the
.rawthat will be used to populate the SD card:./create_sdcard_from_flashlayout.sh ../flashlayout_st-image-weston/trusted/FlashLayout_sdcard_stm32mp157d-dk1-trusted.tsv. The.rawoutput is in the parent folder. - plug the SD card in your PC and find it on the list
cat /proc/partitions16GB, (in my case the name was sdb) - populate the SD card with the
.rawimage using this command:sudo dd if=FlashLayout_sdcard_stm32mp157d-dk1-trusted.raw of=/dev/sdb bs=8M conv=fdatasync status=progress
Now you are able to boot using your SD card.
¶ Booting on board
After successfully populated the SD, we will now connect the board to the PC through ST-LINK using PUTTY (other terminal can be used to do that).
Steps done on Windows 10 pro using putty.
¶ Steps
- run putty on windows
- go serial change the following settings:
- serial line from COM1 to COM4
- speed from 9600 to 115200
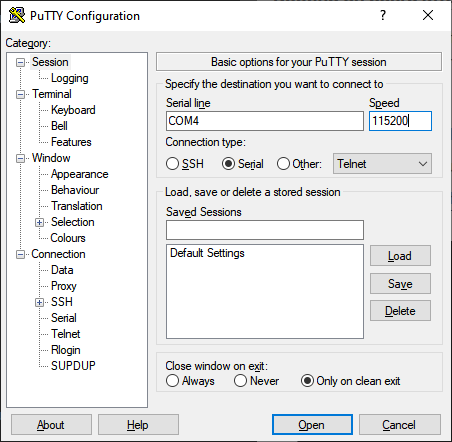
- click on open button
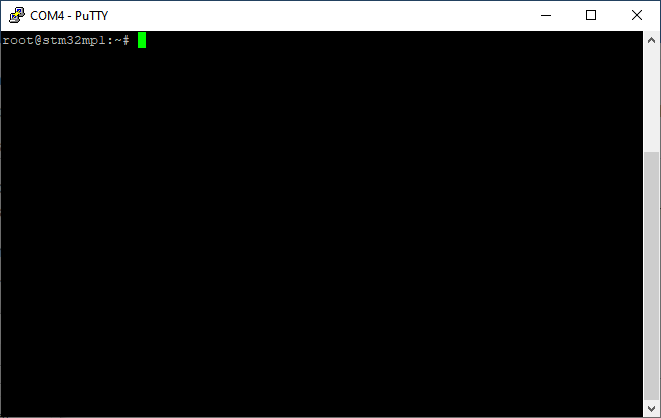
After that if everything has been well done, the following result is expected:
¶ Installing and activating the SDK
In this part, we will download, install and see how to activate the STM Software Development Kit Necessary to compile the provided Linux source code.
¶ Installing extra packages
The installation / activation of the SDK requires some extra packages installed on the machine. Go on and run the following commands in a terminal (Working directory does not matter here):
sudo apt-get update
sudo apt-get install gawk wget git-core diffstat unzip texinfo gcc-multilib build-essential chrpath socat cpio python3 python3-pip python3-pexpect xz-utils debianutils iputils-ping python3-git python3-jinja2 libegl1-mesa libsdl1.2-dev pylint3 pylint xterm
sudo apt-get install make xsltproc docbook-utils fop dblatex xmlto
sudo apt-get install libmpc-dev libgmp-dev
sudo apt-get install libncurses5 libncurses5-dev libncursesw5-dev libssl-dev linux-headers-generic u-boot-tools device-tree-compiler bison flex g++ libyaml-dev libmpc-dev libgmp-dev
sudo apt install python-is-python3
sudo apt-get install coreutils bsdmainutils sed curl bc lrzsz corkscrew cvs subversion mercurial nfs-common nfs-kernel-server libarchive-zip-perl dos2unix texi2html diffstat libxml2-utils
echo 'options mmc_block perdev_minors=16' > /tmp/mmc_block.conf
sudo mv /tmp/mmc_block.conf /etc/modprobe.d/mmc_block.conf
¶ Downloading the SDK
We are now going to download the SDK file. First, make sure the $HOME/STM32MPU_workspace exists. If it does not, create it with the following command.
mkdir $HOME/STM32MPU_workspace
Then create a tmp folder inside this directory and go into it
mkdir $HOME/STM32MPU_workspace/tmp
cd $HOME/STM32MPU_workspace/tmp
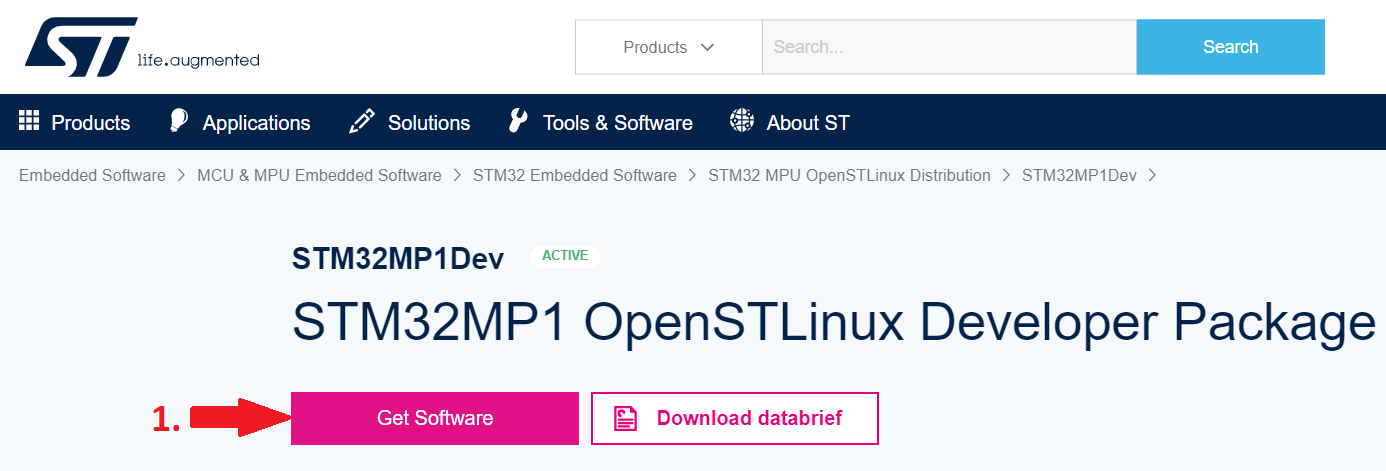
Now, we are ready to download the SDK with this link. Wait a few seconds, then click the pink Get Software button. Click the pink Get latest button next to Yocto_SDK (~1.0 Gb).
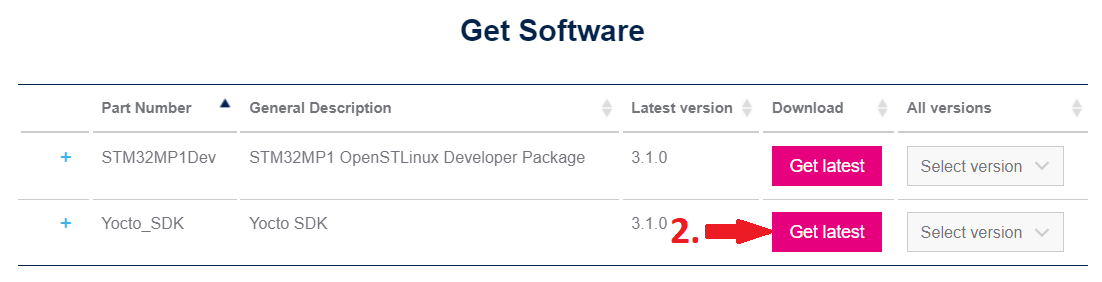
Plase note that the SDK version used in this tutorial is 3.10.0. If you use another version, you may need to adjust to commands used in the following part.
¶ Installing the SDK
Move the freshly downloaded part to the tmp folder we created before and extract it. We then need to create an installation folder for the SDK, make the installation script executable and run it.
mv $HOME/Downloads/en.SDK-x86_64-stm32mp1-openstlinux-5.10-dunfell-mp1-21-11-17.tar_v3.1.0.xz $HOME/STM32MPU_workspace/tmp
tar xvf en.SDK-x86_64-stm32mp1-openstlinux-5.10-dunfell-mp1-21-11-17.tar.xz
mkdir -p $HOME/STM32MPU_workspace/STM32MP15-Ecosystem-v3.1.0/Developer-Package/SDK
chmod +x stm32mp1-openstlinux-5.10-dunfell-mp1-21-11-17/sdk/st-image-weston-openstlinux-weston-stm32mp1-x86_64-toolchain-3.1.11-openstlinux-5.10-dunfell-mp1-21-11-17.sh
./stm32mp1-openstlinux-5.10-dunfell-mp1-21-11-17/sdk/st-image-weston-openstlinux-weston-stm32mp1-x86_64-toolchain-3.1.11-openstlinux-5.10-dunfell-mp1-21-11-17.sh -d $HOME/STM32MPU_workspace/STM32MP15-Ecosystem-v3.1.0/Developer-Package/SDK
If everything went well, you should get the following logs:
ST OpenSTLinux - Weston - (A Yocto Project Based Distro) SDK installer version 3.1.11-openstlinux-5.10-dunfell-mp1-21-11-17
===========================================================================================================================
You are about to install the SDK to "/home/osboxes/STM32MPU_workspace/STM32MP15-Ecosystem-v3.1.0/Developer-Package/SDK". Proceed [Y/n]? y
Extracting SDK.........................................................................................................................................................................................................................done
Setting it up...done
SDK has been successfully set up and is ready to be used.
Each time you wish to use the SDK in a new shell session, you need to source the environment setup script e.g.
 $ . /home/ert/STM32MPU_workspace/STM32MP15-Ecosystem-v3.1.0/Developer-Package/SDK/environment-setup-cortexa7t2hf-neon-vfpv4-ostl-linux-gnueabi
¶ Run the SDK
We will now see how to run the SDK in a terminal.
This operation must be done every time you run a new terminal. Linux compilation won't work otherwise.
In order to start the SDK, you just need to run the following commands:
cd $HOME/STM32MPU_workspace/STM32MP15-Ecosystem-v3.1.0/Developer-Package
source SDK/environment-setup-cortexa7t2hf-neon-vfpv4-ostl-linux-gnueabi
You can create a bash script with these two commands that you can put in your workspace to go faster if you want.
¶ Making sure the SDK is started
We can now run the following commands to make sure the SDK is properly started:
echo $ARCH
echo $CROSS-COMPILE
$CC --version
echo $OECORE_SDK_VERSION
You should get an output like this:
> echo $ARCH
arm

> echo $CROSS-COMPILE
-COMPILE

> $CC --version
arm-ostl-linux-gnueabi-gcc (GCC) 9.3.0
Copyright (C) 2019 Free Software Foundation, Inc.
This is free software; see the source for copying conditions.  There is NO
warranty; not even for MERCHANTABILITY or FITNESS FOR A PARTICULAR PURPOSE.

> echo $OECORE_SDK_VERSION
3.1-openstlinux-5.10-dunfell-mp1-21-03-31
If everything works as intended, congratulations! You can move forward to populate the board.
If you are getting an error or something does not work as intended, you can try starting over from the SDK installation process.
¶ DDR Test suite
To process DDR test use the following documentation and go to 5.3 section : dm00104712-stm32cubemx-for-stm32-configuration-and-initialization-c-code-generation-stmicroelectronics.pdf
¶ Flash OS on prod board
¶ Prerequisites
- Ubuntu 20.04 lts with build-essentials, net-tools packages
- Ckermit 9.0.305 OPEN SOURCE: Alpha.07
- ERT hostboard
- Nucleo TODO add version
- 1x USB-B mini (for nucleo)
- 1x USB-B micro (for ERT hostboard)
¶ Steps
First of all, go to Wildhorn repo and fetch it to your PC. Then get in root repo and go to CM4/RemoteProc.
Once it has been done execute the following command (be sure to have suffisant user exec privileges): ./installer.sh.
TODO what the sh does exactly